|
This knot is a variation on the crown knot and the wall knot and is made in much the same way.
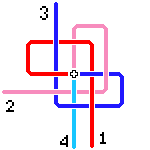
Version 1
Place your string on your worktop, like the spokes of a wheel, if you have already done a little work to start with this should stick upwards.
|
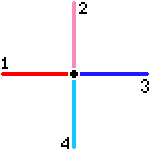 |
Number the strings with the clock,
the one in the nine o'clock position as number 1. |
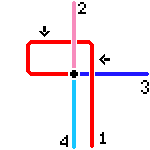 |
Take the number 1 string and bring it under the number 2 and over 3, and place in on the table, leaving little loops at the arrows. |
 |
Now you take string 2 and bring it under string 3 and over string 4 (going over string 1) and again leave a little loop at the arrow, it is the place with the X where you will need the space. |
 |
Number 3 string needs to go under one and over the next as well, remembering to ignore the strings you have already worked, but to get that one it has to go through the loop of string 1. |
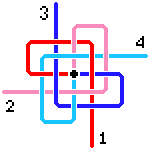 |
And string 4, but to get that one it has to go through the loops of string 1 and 2, still going under one and over the next.
Tighten carefully, and you may have to repeat several times.
While tightening you will notice that the knot wants to fold down, let it, unless you have a reason to keep it upwards. Keeping it horizontal is not often useful, it will fold at is own time.
I have not made a picture of this knot tightend, because you can not see much. If you want to see what it looks like, see the last picture in the next version.
|
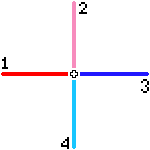 |
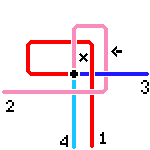
Place your string on your worktop, like the spokes of a wheel, if you have already done a little work to start with this should stick down, into a hole in the table if you have one.
To keep things easy I kept the layout of the strings the same.
Number the strings with the clock,
the 1 in the nine o'clock position as number 1. |
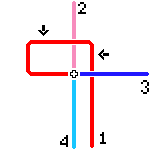 |
Take the number 1 string and bring it over the number 2 and under 3, and place in on the table, leaving little loops at the arrows. |
 |
Now you take string 2 and bring it over string 3 and under string 4 (going under string 1) and again leave a little loop at the arrow, it is the place with the X where you will need the space. |
 |
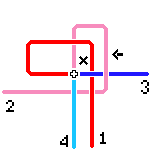
Number 3 string needs to go over one and under the next as well, remembering go under the strings you have already worked but not counting them, but to get that one it has to go through the loop of string 1. |
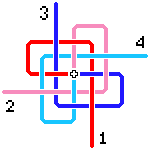 |
And string 4, but to get that one it has to go through the loops of string 1 and 2, still going over one and under the next.
|
 |
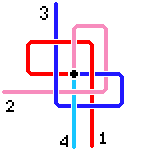
Tighten carefully, putting equal pressure on each string. You may have to repeat that several times. And, as you can see in the picture, from above this knot doesn't show, it is from the side you want to see it, it looks like a braid there. |
If you work version 1 in the hand, you can hold the strings you have worked with within your hand. It makes this knot less confusing but it needs a different approach.
In version 2 the strings have to get out of the way into the air. If you have a fixed point above your work, you can try to use that. If your string is long enough, you may even drape them over your shoulder.
You may repeat this knot if you want, but it works better as a single knot within a series of crown knots. It will look like a turks head knot made around the crown knots.
Click here for the versions 1 and 2 without the ends of the strings. |

